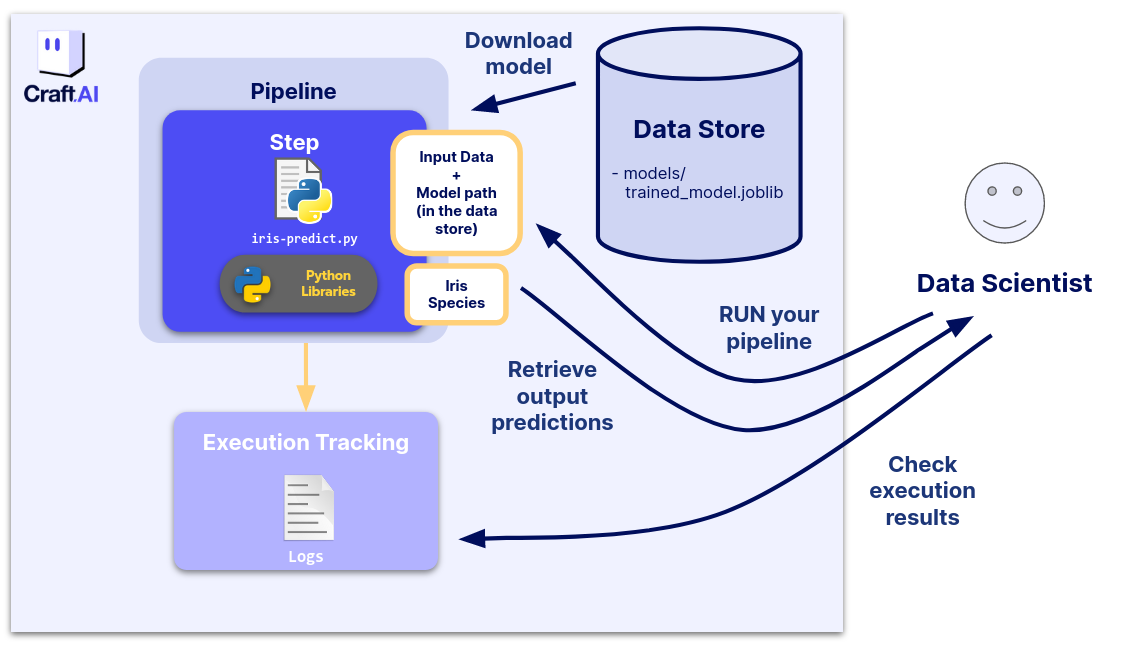
Part 3: Execute a ML use case with inputs and outputs
In Part 2, we have built and run our first ML pipeline to retrieve data from the data store, train a model and store it on the data store.
We will now train our model with new data, by adding an Input to the pipeline and send the predictions to a final user, by adding an Output to the pipeline.
- We will first create the code of the
predictIris()function so that it can receive data and return predictions. - Then, we will see how to create a step, a pipeline and run it on the platform with input data and return the corresponding predictions as an output.
By the end of this part, we will have built a runable pipeline that allows to get the predictions of the iris species on new data with a simple execution.
Prerequisites
- Python 3.8 or higher is required to be installed on your computer.
- Have done the previous parts of this tutorial (Part 1: Execute a simple pipeline and Part 2: Execute a simple ML model).
Overview of the use case
We will build a pipeline to retrieve the trained model stored in the last part and make a prediction on new data.
The code we want to execute
First we have to implement our code to compute predictions with a stored model on
the data store on any (correctly prepared) data given as input instead of computing
predictions on a test set.
Hence, our file src/part-3-iris-predict.py is as follows:
from io import BytesIO
from craft_ai_sdk import CraftAiSdk
import joblib
import pandas as pd


def predictIris(input_data: dict, input_model_path:str):

   sdk = CraftAiSdk()

   f = BytesIO()
   sdk.download_data_store_object(input_model_path, f)
   model = joblib.load(f)

   input_dataframe = pd.DataFrame.from_dict(input_data, orient="index")
   predictions = model.predict(input_dataframe)

   final_predictions = predictions.tolist()

   return {"predictions": final_predictions}
In this code:
- We add the argument
input_data. Here, we choose it to be a dictionary like the one below:
{
    1: {
        'sepal length (cm)': 6.7,
      'sepal width (cm)': 3.3,
      'petal length (cm)': 5.7,
      'petal width (cm)': 2.1
    },
  2: {
      'sepal length (cm)': 4.5,
      'sepal width (cm)': 2.3,
      'petal length (cm)': 1.3,
      'petal width (cm)': 0.3
  },
}
It contains the data on which we want to compute predictions.
-
We retrieve our trained model with the
download_data_store_object()function of the sdk by passing the model path. -
At the end, we convert our
input_datadictionary into a Pandas dataframe, and we compute predictions with our trained model. -
As you can see, the function now returns a Python dict with one field called “predictions” that contains the predictions value. The platform only accepts step function with one return value of type ``dict``. Each item of this dict will be an output of the step and the key associated with each item will be the name of this output on the platform.
-
Moreover, you can see that we converted our
resultfrom a numpy ndarray to a list. That is because the values of the inputs and outputs are restricted to native Python types such as int, float, bool, string, list and dict with elements of those types. More precisely anything that is json-serializable. Later, the platform might handle more complex input and output types such as numpy array or even pandas dataframe.
Dont forget to update your requirements.txt file,
containing the list of Python libraries used in our step function:
Tip
Example with up-to-date version numbers available here.
Step creation with Input and Output
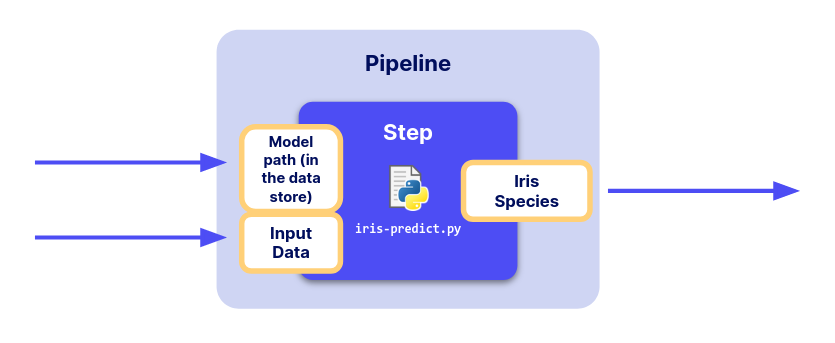
Now, let’s create our step on the platform. Here, since we have inputs and an output, our step is the combination of three elements:
an input, an output and the Python function above. We will first declare the inputs and the output.
Then, we will use the function sdk.create_step() as in Part 2 to create the whole step.
Declare Input and Output for a new step
To manage inputs and outputs of a step, the platform requires you to
declare them using the Input and Output classes from the
SDK.
For our Iris application, the inputs and outputs declaration would look like this:
from craft_ai_sdk.io import Input, Output

prediction_input = Input(
   name="input_data",
   data_type="json"
)

model_input = Input(
   name="input_model_path",
   data_type="string"
)

prediction_output = Output(
   name="predictions",
   data_type="json"
)
Both objects have two main attributes:
-
The
nameof theInputorOutput -
For the inputs it corresponds to the names of the arguments of your step’s function. In our case
name="input_data"and"input_model_path", as in the first line of function: -
For the output it must be a key in the dictionary returned by your step’s function. In our case,
name="predictions"as in the last line of function: -
The
data_typedescribes the type of data it can accept. It can be one of: string, number, boolean, json, array, file. -
For the inputs we want a dictionary and a string as we specified, which corresponds to
data_type="json"anddata_type="string". - For the output, we return a dictionary which corresponds to
data_type="json".
Now, we have everything we need to create the step and the pipeline corresponding to our
predictIris() function.
Create step
Now as in Part 2, we'll create our step on the platform using
the sdk.create_step() function, but this time we specify our inputs
and output:
sdk.create_step(
   step_name="part-3-irisio",
   function_path="src/part-3-iris-predict.py",
   function_name="predictIris",
   description="This function retrieves the trained model and classifies the input data by returning the prediction.",
   inputs=[prediction_input, model_input],
   outputs=[prediction_output],
   container_config={
     "local_folder": ".../get_started", # Enter the path to your local folder here
     "requirements_path": "requirements.txt",
   },
)
This is exactly like in part 2, except for two parameters:
inputscontaining the list ofInputobjects we declared above (here,prediction_inputandmodel_input).outputscontaining the list ofOutputobjects we declared above (here,prediction_output).
When step creation is finished, you obtain a return describing your step (including its inputs and outputs) as below:
>> Step "part-3-irisio" created
  Inputs:
    - input_data (json)
    - input_model_path (string)
  Outputs:
    - predictions (json)
>> Steps creation succeeded
>> {'name': 'part-3-irisio',
 'inputs': [{'name': 'input_data', 'data_type': 'json'}, {'name': 'input_model_path', 'data_type': 'string'}],
 'outputs': [{'name': 'predictions', 'data_type': 'json'}]}
Now that our step is created in the platform, we can embed it in a pipeline and run it.
Create pipeline
Let’s create our pipeline here with sdk.create_pipeline() as in
Part
2:
You quickly obtain this output, which describes the pipeline, its step and its inputs and outputs:
>> Pipeline creation succeeded
>> {'pipeline_name': 'part-3-irisio',
 'created_at': 'xxxx-xx-xxTxx:xx:xx.xxxZ',
 'steps': ['part-3-irisio'],
 'open_inputs': [{'input_name': 'input_data',
   'step_name': 'part-3-irisio',
   'data_type': 'json'}, {'input_name': 'input_model_path',
   'step_name': 'part-3-irisio',
   'data_type': 'string'}],
 'open_outputs': [{'output_name': 'predictions',
   'step_name': 'part-3-irisio',
   'data_type': 'json'}]}
Success
🎉 You’ve created your first step & pipeline with inputs and outputs!
Let’s run this pipeline.
Run a pipeline with new input data
Prepare input data
Now, our pipeline needs data as input (formatted as we said above ⬆️). Let’s prepare it, simply by choosing some of the rows of iris dataset we did not use when training our model:
import numpy as np
import pandas as pd
from sklearn import datasets

np.random.seed(0)
indices = np.random.permutation(150)
iris_X, iris_y = datasets.load_iris(return_X_y=True, as_frame=True)
iris_X_test = iris_X.loc[indices[90:120],:]

new_data = iris_X_test.to_dict(orient="index")
Let’s check the data we created:
We get the following output:
>> 124: {'sepal length (cm)': 6.7,
'sepal width (cm)': 3.3,
'petal length (cm)': 5.7,
'petal width (cm)': 2.1
},
41: {'sepal length (cm)': 4.5
...
Finally, we need to encapsulate this dictionary in another one
whose key is "input_data" (the name of the input of our step,
i.e. the name of the argument of our step’s function).
We define also the path to our trained model on the data store with the value
associated to the key "input_model_path".
In particular, when your step has several inputs, this dictionary should have as many keys as the number of inputs the step have.
Execute the pipeline (RUN)
Finally, we can execute our pipeline with the data we’ve just prepared by
calling the run_pipeline() function almost as in Part 2 and passing our dictionary inputs
to the inputs arguments of the function:
Finally, our output can be obtained like this:
This gives the output we want (with the predictions!):
Moreover, you can check the logs on the web interface, by clicking on the Executions tracking tab of your environment, selecting your pipeline and choosing the last execution.
Success
🎉 Congratulations! You have run a pipeline to which we can pass new data, the path to our trained model and get predictions.
Next step: Part 4: Deploy a ML use case with inputs and outputs