Part 4: Auto deploy a ML use case on scheduler or external call
Introduction
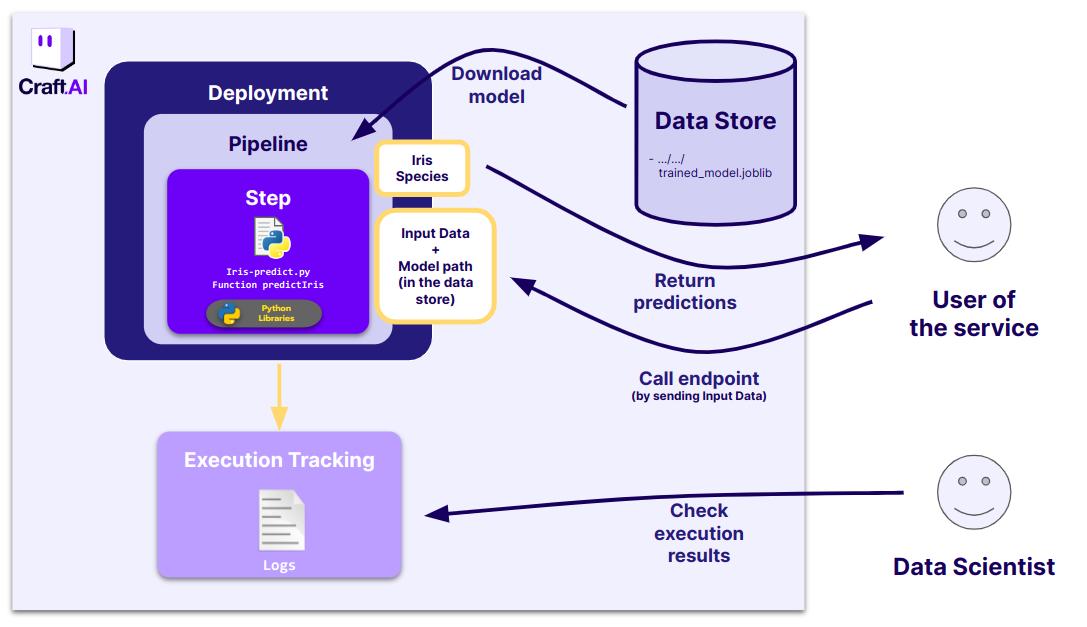
In Part 3, we have built and run our second ML pipeline to retrieve our trained model from the data store, provide some new data to it as input and retrieve the result as an output of our pipeline execution.
What if we want to let an external user execute our predict pipeline? Or if we want to schedule the execution of the pipeline that trains our model periodically?
⇒ We need to deploy one pipeline via an endpoint or with a scheduled execution.
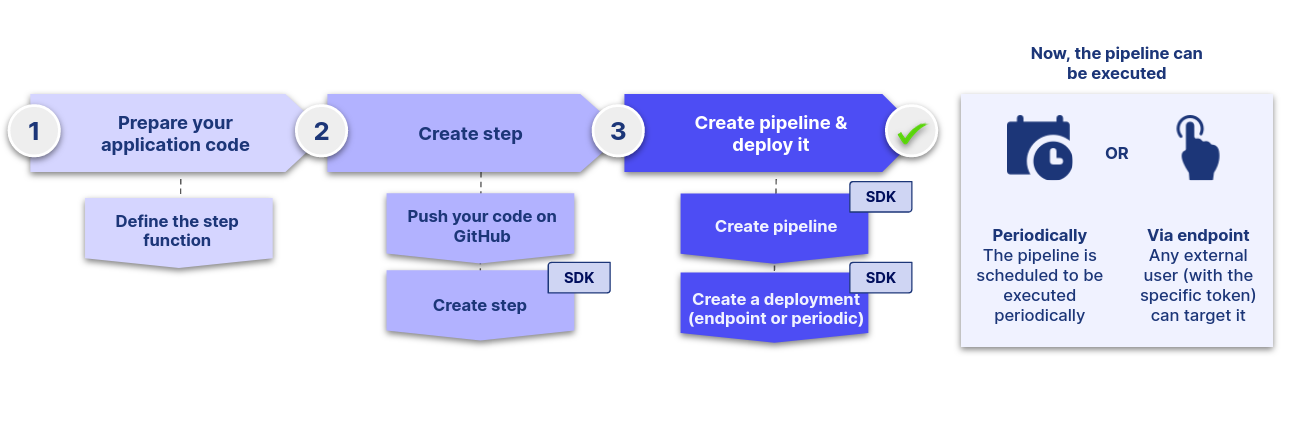
This part will show you how to do this with the Craft AI platform:
- We will first update the code of the
predictIris()function so that it can retrieve directly from the data store the trained model and returns the predictions as a json to the user. - We will also update the code of the
trainIris()function so that it re trains the model on a specific dataset (that could be often updated) and uploads the trained model directly to the datastore. - Then, we will see how to create a pipeline that we will deploy in two different ways, and that could be executed periodicly or by an external call.
Prerequisites
- Python 3.9 or higher is required to be installed on your computer.
- Have done the previous parts of this tutorial ( Part 0: Setup, Part 1: Execute a simple pipeline, Part 2: Execute a simple ML model, Part 3: Execute a ML use case with inputs and outputs).
Use case
Here we will build an application based on what we did on the last part. We will expose our service to external users and schedule periodic executions.
Overview
- To get the predictions via and endpoint:
- To retrain the model periodicly :

The code we want to execute
We will first focus on the construction of the endpoint the final user will be able to target.
First we have to update our code to retrieve directly the model from the data store without any call to the sdk in the code and to return a file on the data store with the predictions inside.
We need to change our model retrieval method. input_model is a dictionary in which the key path refers to the file's path where is located the file on the pipeline environnement.
import joblib
import pandas as pd
import json

def predictIris(input_data: dict, input_model:dict):

   model = joblib.load(input_model['path'])

   input_dataframe = pd.DataFrame.from_dict(input_data, orient="index")
   predictions = model.predict(input_dataframe)

   return {"predictions": predictions.tolist()}
Pipeline setup
Declare Input and Output of our new pipeline
The only difference now is the data type we will assign to input_model.
This is now a file that we want to retrieve from the data store.
To do so, we define the inputs and output like this in the terminal :
from craft_ai_sdk.io import Input, Output

prediction_input = Input(
   name="input_data",
   data_type="json"
)

model_input = Input(
   name="input_model",
   data_type="file"
)

prediction_output = Output(
   name="predictions",
   data_type="json"
)
Create your pipeline
We can now run this code in the terminal to create the pipeline :
sdk.create_pipeline(
   pipeline_name="part-4-iris-deployment",
   function_path="src/part-4-iris-predict.py",
   function_name="predictIris",
   description="This function retrieves the trained model and classifies the input data by returning the prediction.",
   inputs=[prediction_input, model_input],
   outputs=[prediction_output],
   container_config={
     "local_folder": ".../get_started", # Enter the path to your local folder here
     "requirements_path": "requirements.txt",
   },
)
When the pipeline creation is finished, you obtain an output describing your pipeline (including its inputs and outputs) as below:
>> Pipeline "part-4-iris-deployment" created
  Inputs:
    - input_data (json)
    - input_model (file)
  Outputs:
    - predictions (json)
>> Pipeline creation succeeded
>> {'name': 'part-4-iris-deployment',
 'inputs': [{'name': 'input_data', 'data_type': 'json'}, {'name': 'input_model', 'data_type': 'file'}],
 'outputs': [{'name': 'predictions', 'data_type': 'json'}]}
Autodeploy trigger
Here, we want to be able to execute the pipeline, either by launching the execution with an url link or at a certain time, but not by a run anymore.
First, the URL link.
We want the user to be able to:
- send the input data directly to the application via an url link
- retrieve the results directly from the endpoint
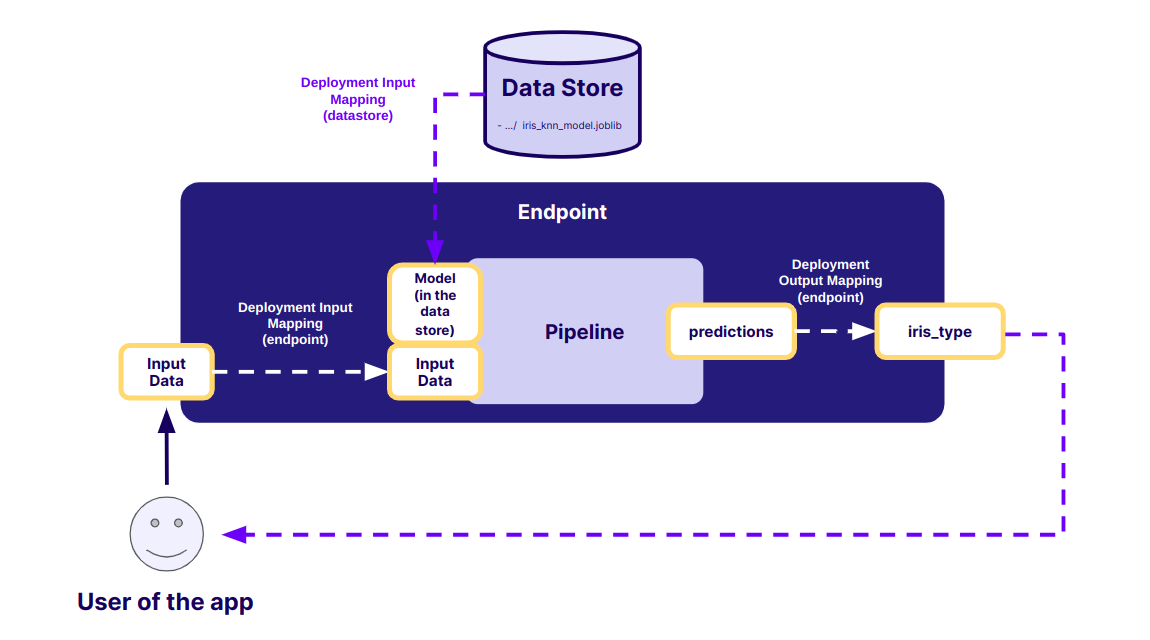
We want also to specify the path to the stored model on the data store, so that the service will take this model directly from the data store. The user won't be the one selecting the model used, it's only on the technical side.
Endpoint creation
An endpoint is a publicly accessible URL that launches the execution of the Pipeline.
To create an endpoint, go to the UI. Once in your project, go to the Pipelines page and select your environment. On this page select your pipeline part-4-iris-deployment and press Deploy.
On the page, enter the name for your deployment, (here you will use part-4-iris-deployment) and select Elastic mode in Execution Mode and Endpoint in Execution Rule.

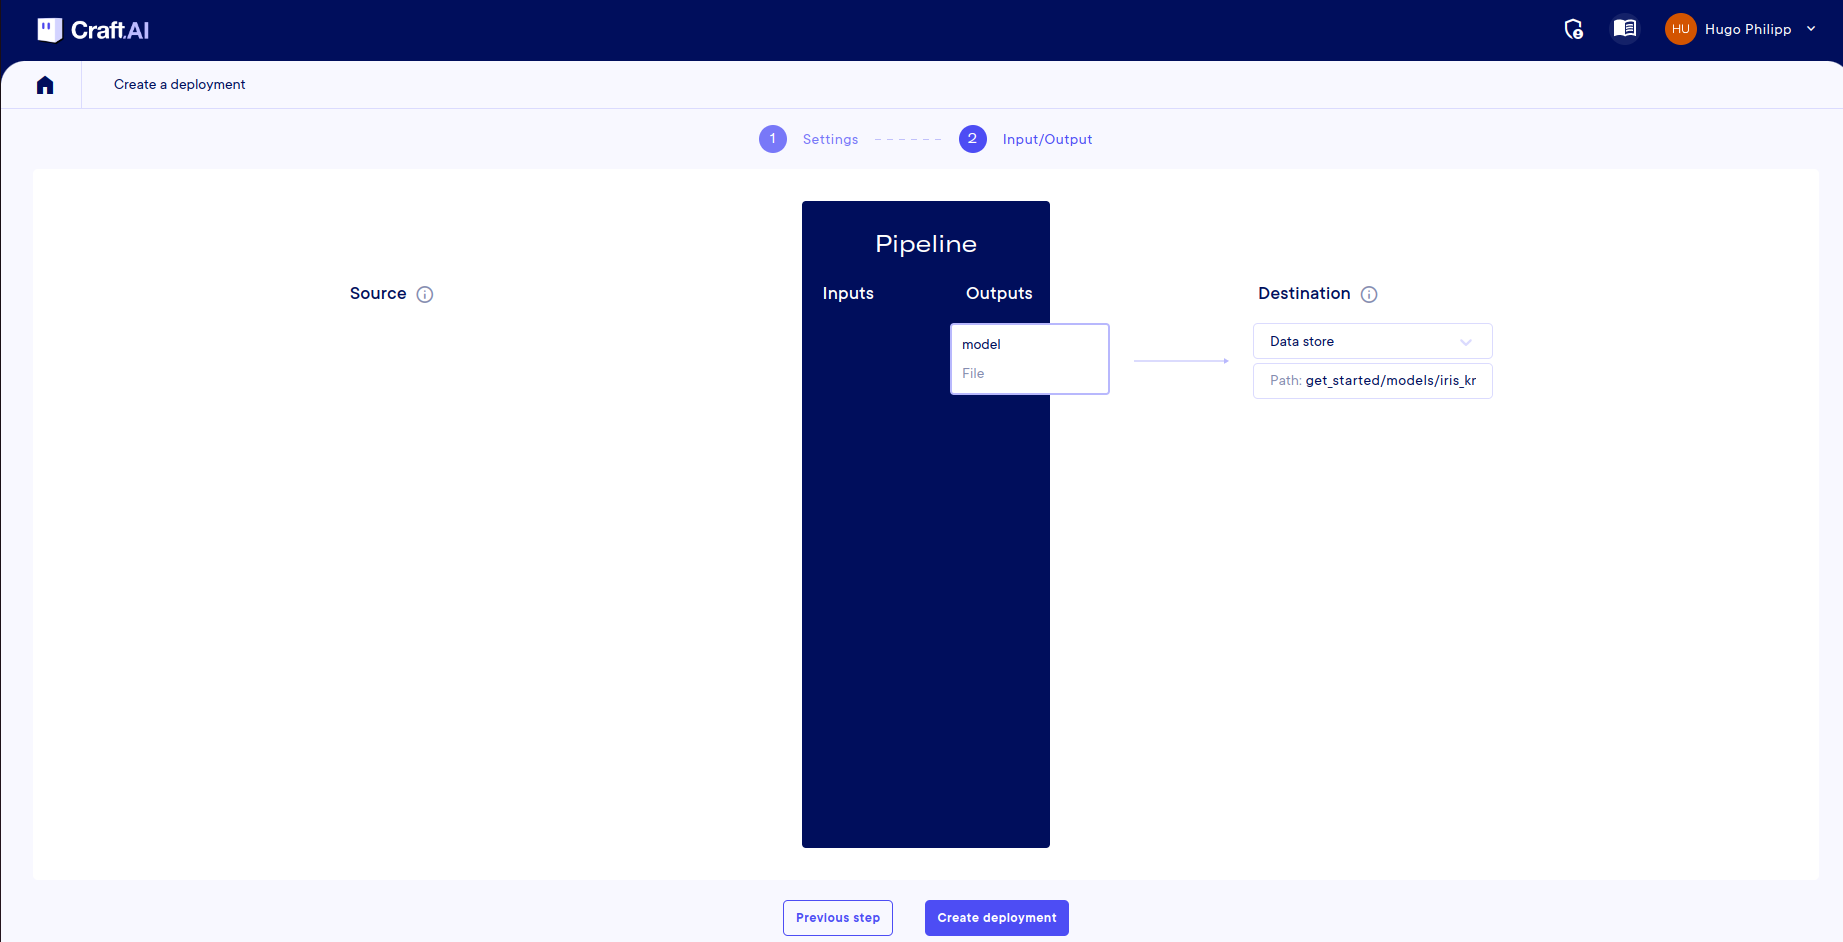
Once you have done this, click on 'Next Step' where you will be presented with the mapping page to fill in. For each input and output in your pipeline, you need to define the source or destination:
- Input
input_data: Select Endpoint. You can leave the default name inExposed name. - Input
input_model: Select Datastore and enter the path to the fileget_started/models/iris_knn_model.joblibin the Datastore. - Output
predictions: Select Endpoint andiris_typeas the exposed name.
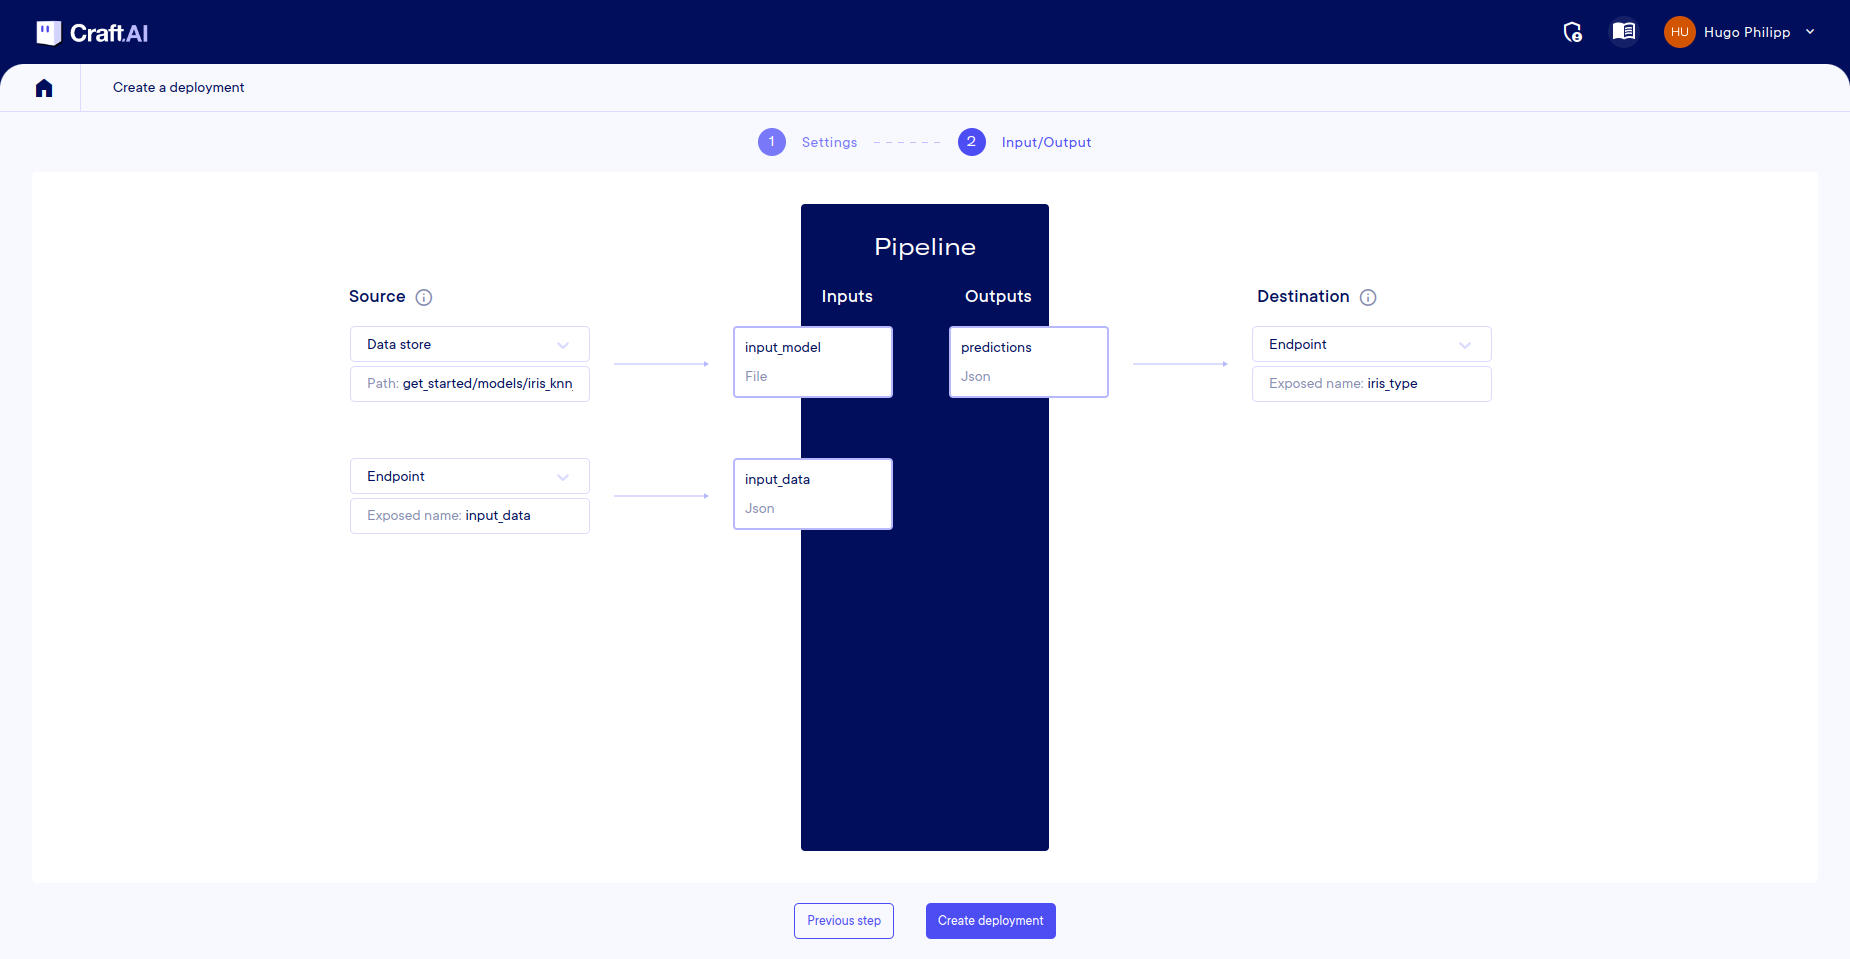
Then click Create Deployment and the build will begin.
Prepare the input data
Now, our endpoint needs data as input, like we did previously:
import numpy as np
import pandas as pd
from sklearn import datasets

np.random.seed(0)
indices = np.random.permutation(150)
iris_X, iris_y = datasets.load_iris(return_X_y=True, as_frame=True)
iris_X_test = iris_X.loc[indices[90:120],:]

new_data = iris_X_test.to_dict(orient="index")

inputs = {
    "input_data": new_data
}
First, get your ENDPOINT_TOKEN from the UI :
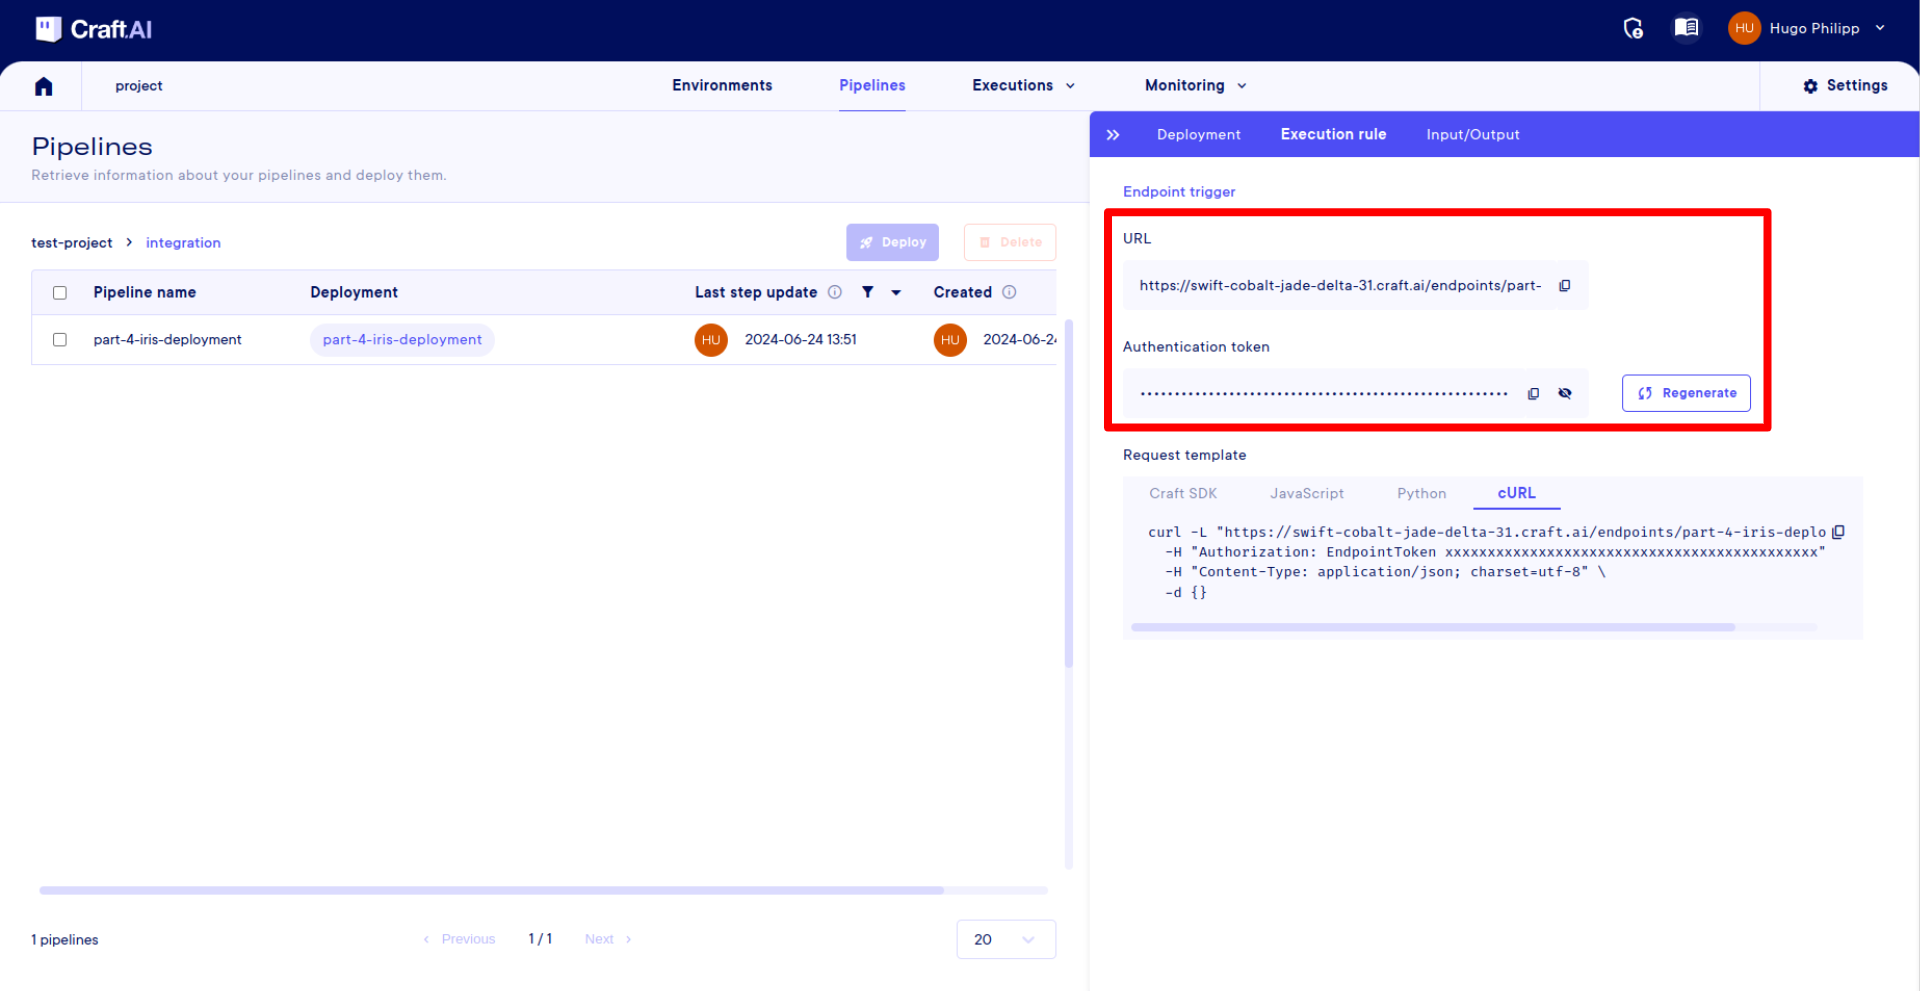
endpoint_url = sdk.base_environment_url  + "/endpoints/part-4-iris-deployment"
endpoint_token = "MY_ENDPOINT_TOKEN"
request = requests.post(endpoint_url, headers={"Authorization": f"EndpointToken {endpoint_token}"}, json=inputs)
request.json()
It is a way to call your deployment. But, obviously, you can call it with any other HTTP client (curl command in bash, Postman…).
Warning
Note that you can't directly call your endpoint and receive the output by entering the URL in your web browser, as the request is based on the POST method and requires an authentication header.
Let's check we can get the predictions as output of the endpoint:
Tip
Moreover, you can check the logs on the UI, by clicking on the Executions tab of your environment, selecting your pipeline and choosing the last execution.
Success
🎉 You’ve created your first deployment and you've just called it!
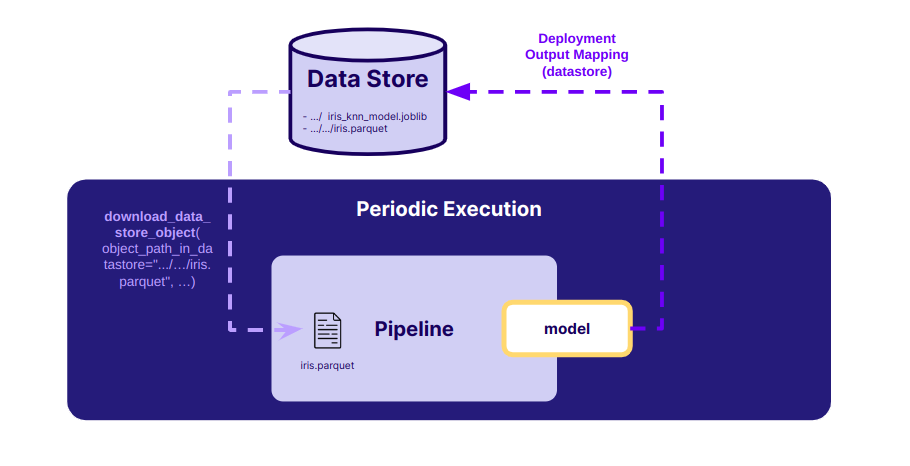
Schedule model retrain
Let's imagine that our dataset is frequently updated, for instance we get new labeled iris data every day. In this case we might want to retrain our model by triggering our training pipeline part4-iris-train every day.
The platform can do this automatically using the periodic execution rule in our deployment. It allows to schedule a pipeline execution at a certain time. For example, every Monday at a certain time, every month, every 5 minutes etc.
The inputs and output have to be defined, with a constant value or a data store mappings.
First we will update our trainIris function so that it produces a file output containing our model, that we will then map to the datastore.
You can check the entire updated version of this function in src/part-4-iris-predict.py.
The only change is done at the return of the function:
We can then create the pipeline as we are used to.
train_output = Output(
   name="model",
   data_type="file"
)

sdk.create_pipeline(
   pipeline_name="part-4-iristrain",
   function_path="src/part-4-iris-predict.py",
   function_name="trainIris",
   container_config={
        "local_folder": ".../get_started", # Enter the path to your local folder here
   },
   outputs=[train_output],
)
Now let's create a deployment that executes our pipeline every 5 minutes (In a real case, we would have set it to every day. However, for this example, let's set it to every 5 minutes, so we can see it in action immediately). In our case, we will map the prediction output (which is our only I/O) to the datastore on the same path that is used in the pediction endpoint deployment. This way our prediction pipeline will automatically use the latest version of our model for predictions.
Create periodic deployment
Let's create a deployment that will schedule our pipeline to be executed every 5 minutes. IO mappings will be the same as in the endpoint, except that this time the input data is a constant and not something that is provided to the endpoint whenever it is called.
Let's return to the Pipelines page and deploy our pipeline. Select Elastic for the Execution Mode and Periodic for the Execution Rule. We then need to add a trigger (at the bottom of the page) and specify that the execution should be repeated every 5 minutes.
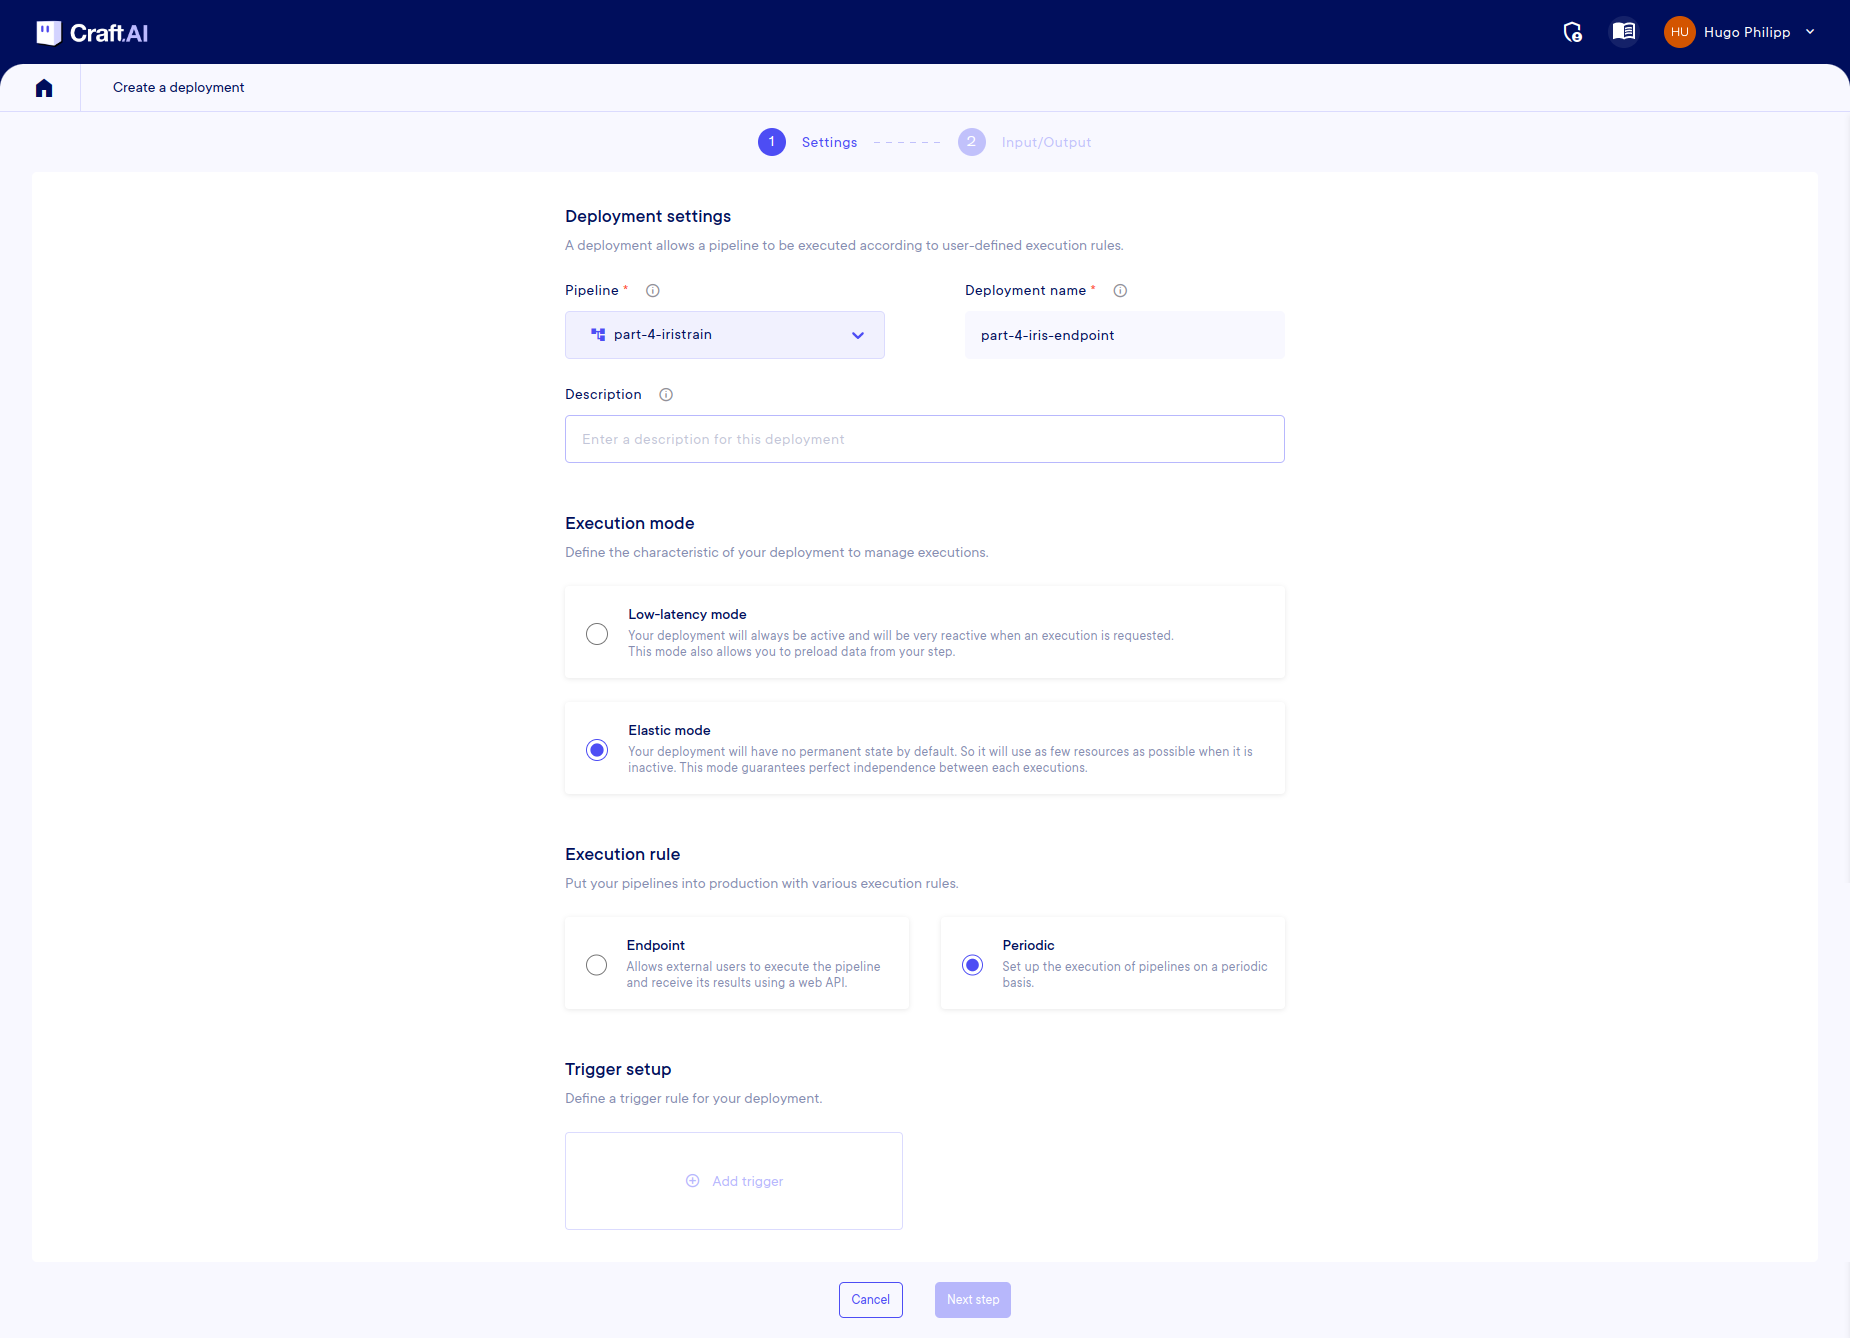
Once the trigger is created you can go to the Next step.
Adapt IO mapping
Then, you need to define the destination of your output:
- Output
model: Select Datastore and enter the path to the fileget_started/models/iris_knn_model.joblibin the datastore.
And now, you can complete the deployment of your pipeline.
Our training pipeline will now be executed every 5 minutes, updating our model with the potential new data. The predict pipeline will then use this updated model automatically.
You can check that you actually have a new execution every 5 minutes using the sdk or via the web interface.
Success
🎉 Congrats! You’ve created your second deployment and planned it to run every 5 minutes!
Conclusion
Success
🎉 After this Get Started, you have learned how to use the basic functionalities of the platform! You know now the entire workflow to create a pipeline and deploy it.
You are now able to:
- Deploy your code through a pipeline in a few lines of code, run it whenever you want and have the logs to analyze the execution.
- Use the Data Store on the platform to upload and download files, models, images, etc.
- Execute your pipeline via an endpoint that is accessible from outside with a secured token, or via a periodic execution.
- Make your inputs flexible: set constant values to avoid users to fill in, let users enter inputs values via the endpoint directly, or use the data store to retrieve or put objects.
If you want to go further
One concept has not been explained to you: the metrics.
If you want to go further and discover this feature, you can read the associated documentation.