Create an environment
An environment is the infrastructure used by the platform to store data and run computation. The first thing to do when you have created a new project is to create an environment composed of a cluster and a Data store.
Set up an environment
To create an environment, you need to get into a Project and click on the top right corner "New environment".
You need to fill some information to create your environment. This form is split in 4 sections :
General: General information such as nameComputing resources: The specifications of the virtual machine your pipeline will run onStorage resources: The specifications of the Data store, that allows you to upload files or use a vector database for LLMRuntime Planner: To avoid wasting resources, you can plan to shutdown and restart your environment whenever you want, like to have it up only certain days of to shut it for the night to reduce its cost and environmental footprint.
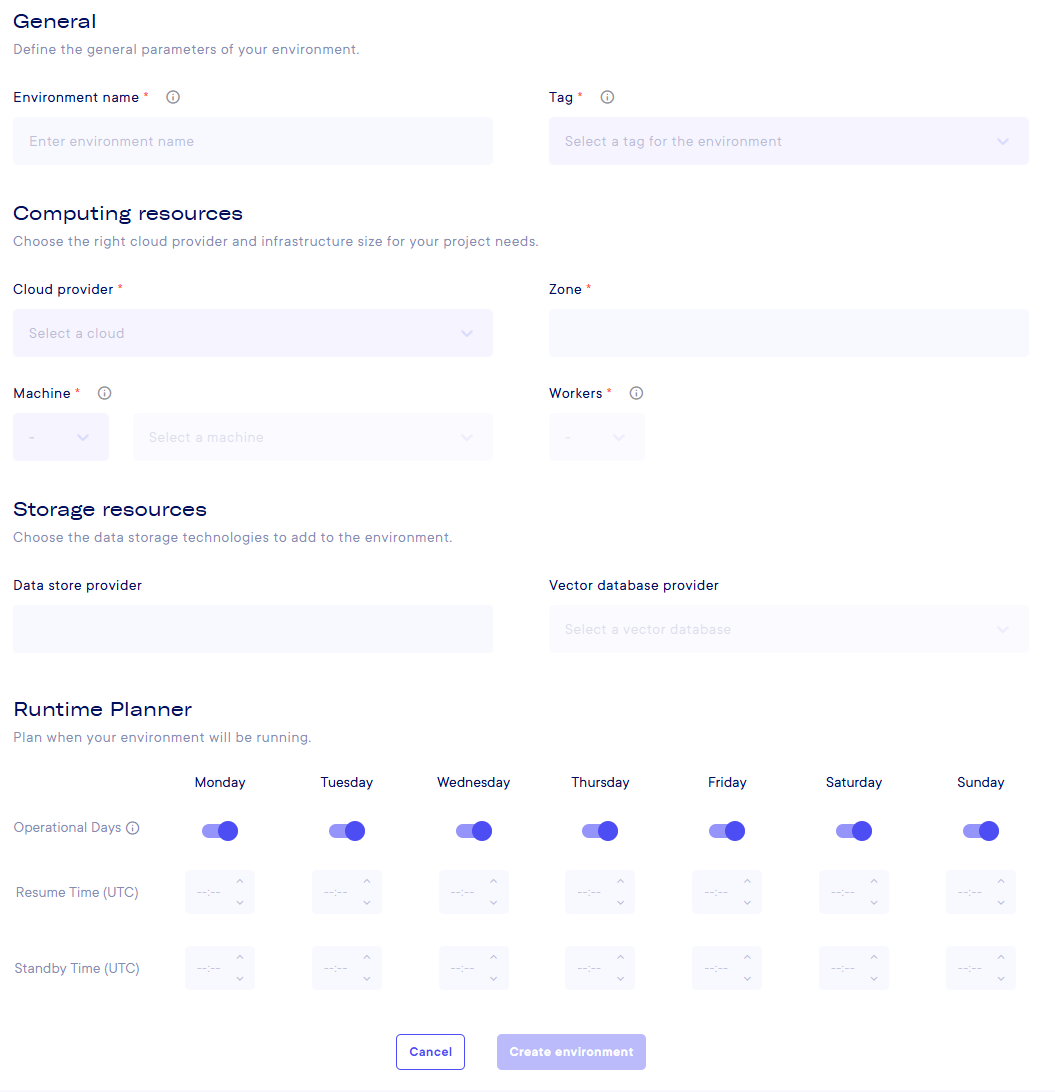
In General :
Environment name: needs to be between 3 and 20 characters, with no special characters (@, \, *, etc.)Tag: Experimentation, Testing, Production.
In Computing resources :
Cloud provider: AWS, GCP, S3NS or ScalewayZone: Will be automaticaly selected based on the cloud provider (France for GCP & Scaleway, Netherlands for S3NS and Europe for AWS)Machine: CPU or GPU (a GPU will cost more, but may be mandatory for your projects based on the calculation you need to do) and select a machine size (full table below)Workers: Select a number of workers that will allow task parallelization
We set arbitrary "Size" for different machine based on each provider. Here is the default configuration that is parametered in the Platform. This can be modified, but you need to contact us for this.
| Provider | Size | Hardware | Reference | Disk | Workers |
|---|---|---|---|---|---|
| AWS | CPU size 1 | 2CPU 4GB | t3a.medium | 20 Go | 2, 4, 6, 8, 10 |
| AWS | CPU size 2 | 4CPU 16GB | t3a.xlarge | 20 Go | 2, 4, 6, 8, 10 |
| AWS | CPU size 3 | 8CPU 32GB | t3a.2xlarge | 20 Go | 2, 4, 6, 8, 10 |
| AWS | CPU size 4 | 16CPU 64GB | m6a.4xlarge | 20 Go | 2, 4, 6, 8, 10 |
| AWS | GPU size 1 | 1GPU (T4) 16GB (VRAM) | g4dn.xlarge | 100 Go | 2, 4, 6, 8, 10 |
| AWS | GPU size 2 | 1GPU (A10G) 24GB (VRAM) | g5.xlarge | 100 Go | 2, 4, 6, 8, 10 |
| AWS | GPU size 3 | 4 GPU (T4) 48 GB (VRAM) | g4dn.12xlarge | 200 Go | 2, 4, 6, 8, 10 |
| Scaleway | CPU size 1 | 2CPU 4GB | PLAY2-NANO | 20 Go | 1, 2, 4, 6, 8, 10 |
| Scaleway | CPU size 2 | 4CPU 16GB | PLAY2-MICRO | 20 Go | 1, 2, 4, 6, 8, 10 |
| Scaleway | CPU size 3 | 8CPU 32GB | PRO2-S | 20 Go | 1, 2, 4, 6, 8, 10 |
| Scaleway | CPU size 4 | 16CPU 64GB | POP2-16C-64G | 20 Go | 1, 2, 4, 6, 8, 10 |
| Scaleway | GPU size 1 | 1GPU (L4) 24GB (VRAM) | L4-1-24G | 100 Go | 1, 2, 4, 6, 8, 10 |
| Scaleway | GPU size 2 | 1GPU (L40S) 96GB (VRAM) | L40S-1-48G | 100 Go | 1, 2, 4, 6, 8, 10 |
| GCP | CPU size 1 | 2CPU 8GB | n2d-standard-2 | 20 Go | 1, 2, 4, 6, 8, 10 |
| GCP | CPU size 2 | 4CPU 16GB | n2d-standard-4 | 20 Go | 1, 2, 4, 6, 8, 10 |
| GCP | CPU size 3 | 8CPU 32GB | n2d-standard-8 | 20 Go | 1, 2, 4, 6, 8, 10 |
| GCP | CPU size 4 | 16CPU 64GB | n2d-standard-16 | 20 Go | 1, 2, 4, 6, 8, 10 |
| GCP | GPU size 1 | 1GPU T4 | n1-standard-4 | 100 Go | 1, 2, 4, 6, 8, 10 |
| GCP | GPU size 2 | 1GPU L4 | g2-standard-4 | 100 Go | 1, 2, 4, 6, 8, 10 |
| S3NS | CPU size 1 | 2CPU 8GB | n2d-standard-2 | 20 Go | 1, 2, 4, 6, 8, 10 |
| S3NS | CPU size 2 | 4CPU 16GB | n2d-standard-4 | 20 Go | 1, 2, 4, 6, 8, 10 |
| S3NS | CPU size 3 | 8CPU 32GB | n2d-standard-8 | 20 Go | 1, 2, 4, 6, 8, 10 |
| S3NS | CPU size 4 | 16CPU 64GB | n2d-standard-16 | 20 Go | 1, 2, 4, 6, 8, 10 |
| S3NS | GPU size 1 | 1GPU T4 | n1-standard-4 | 100 Go | 1, 2, 4, 6, 8, 10 |
| S3NS | GPU size 2 | 1GPU L4 | g2-standard-4 | 100 Go | 1, 2, 4, 6, 8, 10 |
In Storage resources :
Data store provider: Automaticaly filled with the cloud providerVector database provider: you can choose to add a Vector DB to your project. It only has one choice for now : Weaviate. More details at Vector DB Documentation
In Runtime Planner :
Operational Days: Toogle the day you want your environment to shut down (the weekends for example)Resume Time: The time in UTC when the environment should restart (please, keep in mind that it's not instantaneous so plan with a little delay)Standby Time: The time in UTC when the environment starts shutting itself down
Manage an environment
Once the environment is created, you can manage it with settings.
From the environment page, you have 3 options :
- Access the settings : Goes to the Settings page, detailed below
- Put operational/put on standby : Use if your environment is in standby state or up and running to change its state. Once it's on standby, you cannot run anything but can still access everything on "read-only" mode.
- Delete : Delete the environment and all its associated content
The Settings page is separated in two main parts :
- A drop-down menu that lists all the environments created on the project
- A section that presents information regarding the current selected environment
- A first tab that presents information regarding
- The environment, as it was selected during its creation (name & type) and extra information (status, URL, IP address, creation date)
- Its resources (cloud provider and Machine size) that cannot be modified
- Its runtime planner that can be changed with the same options as the creation form (operational days, resume time, standby time)
- A second tab listing all the environment variables of the environment, with the possibility to add more using key/value couples
Handle data in the Data Store
As each environment has its own Data store, you are able to store documents of information on it and download the results of your processing. This part is detailed in the Datastore part of the documentation.